To center your screen, adjust the monitor settings through the control panel. Also, check your graphics card settings.
A misaligned screen can be frustrating, affecting your productivity and viewing experience. This issue often arises due to incorrect monitor or graphics card settings. Ensuring your screen is properly centered enhances your comfort and efficiency. Adjusting your monitor settings through its built-in control panel or the graphics card settings can usually resolve this issue.
Regularly updating your graphics card drivers and monitor firmware can also help maintain optimal screen alignment. These simple steps can significantly improve your overall computing experience, making it more enjoyable and less stressful.

Credit: www.reddit.com
Common Causes
Is your screen not centered on your monitor? This issue can be annoying and disrupt your work. Understanding the common causes can help you fix it quickly. Let’s explore the primary reasons behind this problem.
Misconfigured Settings
Misconfigured settings are often the culprit. Check the display settings on your computer. Ensure the resolution matches your monitor’s native resolution. Follow these steps:
- Right-click on the desktop and select Display settings.
- Scroll to Resolution and set it to the recommended value.
- Click Apply and then Keep changes.
Another common issue is the aspect ratio. Make sure it’s set correctly:
- Open Display settings again.
- Look for Scale and layout.
- Adjust the scaling to 100% or as recommended.
Sometimes, graphics driver updates can reset your settings. Check for updates:
- Open Device Manager.
- Expand the Display adapters section.
- Right-click your graphics card and select Update driver.
Hardware Issues
Hardware issues can also cause the screen to be off-center. Check the cable connections first:
- Ensure the HDMI, DVI, or VGA cable is securely plugged in.
- Try using a different cable if possible.
- Inspect the ports on both the monitor and the computer for any damage.
Sometimes, the monitor itself could be the problem. Use the monitor’s built-in settings to adjust the display:
- Press the Menu button on your monitor.
- Navigate to Position or Image settings.
- Use the arrows to center the screen.
If these steps don’t work, the monitor might be faulty. Consider testing with another monitor.

Credit: www.reddit.com
Adjust Display Settings
If your screen is not centered on your monitor, it can be frustrating. Adjusting your display settings might be the solution. Both Windows and Mac offer built-in tools to help you. Follow these steps to center your screen properly.
Windows Display Settings
To adjust the display settings on a Windows computer, follow these steps:
- Right-click on the desktop.
- Select Display settings from the context menu.
- Find the Scale and layout section.
- Adjust the Resolution to the recommended setting.
- Click on Display orientation and select Landscape.
- Click Apply and then Keep changes.
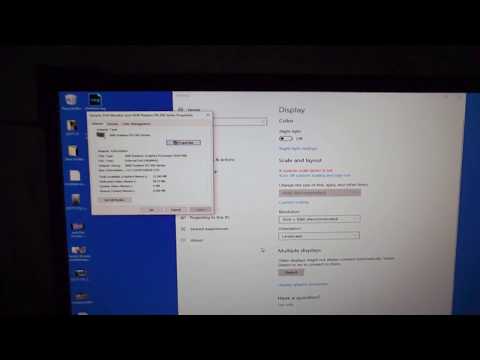
If the screen is still off-center, try the Advanced display settings:
- Click on Advanced display settings at the bottom.
- Check if the correct monitor is selected.
- Adjust the Refresh rate to the recommended value.
- Click Apply and then Keep changes.
You might also need to adjust the settings on your monitor. Use the buttons on the monitor to navigate the Menu. Look for options like Auto Adjust or Position to manually center the screen.
Mac Display Settings
For Mac users, adjusting the display settings is straightforward. Follow these steps:
- Click the Apple menu in the top-left corner.
- Select System Preferences.
- Click on Displays.
- Go to the Display tab.
- Choose the Scaled option for Resolution.
- Select the recommended resolution.
- Click on the Arrangement tab.
- Ensure the Mirror Displays checkbox is unchecked.
If your screen is still not centered, you can try resetting the NVRAM:
- Shut down your Mac.
- Turn it back on and immediately press Option + Command + P + R keys.
- Hold the keys for about 20 seconds.
- Release the keys and let your Mac finish starting up.
You can also adjust the settings using monitor buttons. Navigate through the Menu to find options like Auto Adjust or Position.
| Setting | Windows | Mac |
|---|---|---|
| Resolution | Scale and Layout | Display Tab |
| Orientation | Landscape | Arrangement Tab |
| Advanced | Advanced Display Settings | NVRAM Reset |
Graphics Card Drivers
Experiencing a screen not centered on your monitor can be frustrating. One of the primary causes might be issues with your Graphics Card Drivers. These drivers are crucial for ensuring your display settings are correct. Here’s how to address this problem by focusing on updating or rolling back your drivers.
Update Drivers
Outdated drivers can cause display issues. Follow these steps to update them:
- Open Device Manager on your computer.
- Expand the section labeled Display adapters.
- Right-click on your graphics card and select Update driver.
- Choose Search automatically for updated driver software.
- Follow the on-screen instructions to complete the update.
Updating drivers can fix alignment problems and enhance overall performance. It is a simple yet effective solution.
Rollback Drivers
Sometimes, new updates may cause issues. Rolling back to a previous version can help:
- Open Device Manager.
- Expand the section labeled Display adapters.
- Right-click on your graphics card and select Properties.
- Go to the Driver tab.
- Click on Rollback Driver and follow the prompts.
Rolling back drivers can restore your screen to its proper alignment. This method is useful if the latest update caused the issue.
| Action | Steps |
|---|---|
| Update Drivers |
|
| Rollback Drivers |
|

Credit: www.reddit.com
Monitor Resolution
Experiencing a screen not centered on your monitor can be frustrating. The issue often relates to monitor resolution settings. Understanding and adjusting these settings can help center your screen.
Optimal Resolution
Most monitors come with a recommended resolution. This is known as the optimal resolution. Using the optimal resolution ensures the best display quality. It also helps in centering the screen correctly.
To find the optimal resolution:
- Check the monitor manual or box.
- Look at the display settings in your computer’s control panel.
- Visit the manufacturer’s website.
Setting your monitor to its optimal resolution can solve many display issues.
Custom Resolutions
Sometimes, the optimal resolution may not suit your needs. You can create custom resolutions to better fit your preference. Custom resolutions can help in centering the screen if the default options fail.
Here’s how to set custom resolutions:
- Open your display settings.
- Navigate to the resolution settings.
- Choose the “custom resolution” option.
- Enter your desired resolution values.
- Apply the changes and check the screen alignment.
Creating custom resolutions can be useful for specific tasks or preferences.
Note: Custom resolutions may not always provide the best display quality. It is essential to experiment and find what works best for your setup.
Physical Monitor Adjustments
Is your screen not centered on your monitor? Don’t worry! Physical adjustments can help. Let’s look at two simple methods: button controls and built-in menus. These methods will help you fix your screen in no time.
Button Controls
Most monitors have button controls to adjust the display. These buttons are usually found on the side or bottom of the monitor. Here’s how to use them:
- Press the Menu button.
- Navigate using the arrow buttons.
- Select the Position option.
- Use the arrows to center your screen.
- Press OK to save settings.
These simple steps ensure your display is centered properly.
Built-in Menus
Modern monitors come with built-in menus for adjustments. These menus provide more detailed options. Here’s a guide to using them:
- Access the Main Menu using the physical buttons.
- Find the Display Settings option.
- Select Horizontal Position or Vertical Position.
- Use the arrow keys to adjust the screen position.
- Save your changes by selecting Apply or pressing OK.
With these steps, you can use built-in menus to center your screen.
Both methods are effective and quick. You don’t need special tools. Just follow these steps and enjoy a perfectly centered screen.
Reset Monitor Settings
Sometimes, your screen might not be centered on your monitor. Resetting the monitor settings can often resolve this issue. This guide will help you perform a reset, ensuring your screen is perfectly centered and clear.
Factory Reset
Performing a factory reset can restore your monitor to its original settings. This option is usually available in your monitor’s menu.
- Press the Menu button on your monitor.
- Navigate to the Settings menu.
- Select Factory Reset or Reset All Settings.
- Confirm your selection and wait for the monitor to reset.
After the reset, check if the screen is now centered. If not, try other specific reset options.
Specific Reset Options
Some monitors offer more specific reset options. These can help fine-tune the display settings without a full reset.
| Option | Description |
|---|---|
| Auto Adjustment | Automatically centers the screen and adjusts the display. |
| Horizontal Position | Adjusts the screen’s horizontal alignment. |
| Vertical Position | Adjusts the screen’s vertical alignment. |
Use these options by accessing the monitor’s menu. Adjust each setting until the screen is centered.
Remember, always save your settings after making adjustments. This ensures the changes stay in place.
Software Solutions
Struggling with a screen not centered on your monitor can be frustrating. Thankfully, software solutions exist to help you fix this issue. These tools range from third-party applications to built-in operating system utilities.
Third-party Tools
Several third-party tools can help center your screen. These tools often come with user-friendly interfaces and additional features. Below are some popular options:
- DisplayFusion: Offers precise monitor alignment and multi-monitor support.
- UltraMon: Provides easy screen positioning and taskbar management.
- PowerStrip: Allows fine-tuning of display settings and geometry.
Each tool has its unique features. Compare them to find the best fit for your needs.
Operating System Tools
Your operating system also offers built-in tools to center your screen. These tools are often easy to access and use. Let’s explore some of the options available:
- Windows Display Settings: Go to Settings > System > Display. Adjust screen position using the Advanced display settings.
- macOS Display Preferences: Open System Preferences > Displays. Use the Arrangement tab for screen alignment.
- Linux Display Tools: Use xrandr in the terminal for precise screen positioning.
These operating system tools are reliable and usually effective. They offer simple solutions to fix screen alignment issues.
Check Cable Connections
Is your screen not centered on the monitor? It may be due to loose or faulty cables. Ensuring that all cable connections are secure and of good quality can often resolve this issue.
Secure Connections
Check if the cables are tightly connected to both the monitor and the computer. Loose cables can disrupt the signal. Here’s how to ensure secure connections:
- Turn off the monitor and computer.
- Unplug all cables from the monitor and computer.
- Replug the cables firmly into their respective ports.
Ensure that each cable clicks into place. A loose connection can cause the screen to be off-center. For a quick visual guide, refer to the table below:
| Step | Action |
|---|---|
| 1 | Turn off monitor and computer |
| 2 | Unplug all cables |
| 3 | Firmly replug cables |
Cable Quality
The quality of your cables matters. Poor-quality cables can cause screen issues. Here’s what to look for:
- Inspect the cable for any visible damage.
- Ensure the cable is from a reliable brand.
- Consider upgrading to a high-quality cable if issues persist.
Using a high-quality cable helps maintain a stable connection. It ensures that your screen remains centered and clear.
Multi-monitor Setup
A multi-monitor setup can boost productivity and enhance your computing experience. But sometimes, screens may not align properly. This guide will help you with screen alignment issues and ensure a seamless setup.
Primary Monitor Selection
Choosing a primary monitor is important. It will determine the main display for your tasks. Here’s how you can set it:
- Open Display Settings on your computer.
- Select the monitor you want as primary.
- Check the box labeled Make this my main display.
This primary monitor will now show your taskbar and main applications.
Alignment Issues
Proper alignment ensures a smooth experience across multiple screens. Misalignment can cause discomfort and reduce efficiency. Follow these steps to align your monitors:
| Step | Action |
|---|---|
| 1 | Go to Display Settings. |
| 2 | Drag the monitors to align them. |
| 3 | Match the top edges for a seamless view. |
If screens are still off, adjust their physical positions. Use stands or mounts for precise alignment.
Proper alignment and primary monitor selection are key for a multi-monitor setup. Follow these tips for a perfect display arrangement.
Professional Help
Sometimes, screen issues are tricky. Your monitor screen might not be centered. If you cannot fix this problem, you may need professional help. Here’s a guide to know when to seek help and how to choose a technician.
When To Seek Help
If you have tried fixing the screen position with no luck, it’s time to seek help. Here are some signs:
- The screen remains off-center after adjusting settings.
- The monitor shows flickering or other display issues.
- There are hardware issues, like cable problems.
- You are unsure about technical settings and do not want to risk damage.
Choosing A Technician
Choosing the right technician is crucial. Follow these steps:
- Check Reviews: Look for technicians with good online reviews.
- Ask for Certifications: Ensure the technician has relevant certifications.
- Compare Prices: Get quotes from multiple technicians to compare costs.
- Experience: Choose someone with experience in monitor repairs.
Below is a table to help you compare different technicians:
| Technician | Experience | Price Range | Certifications |
|---|---|---|---|
| John Doe | 5 years | $50-$100 | CompTIA A+ |
| Jane Smith | 8 years | $60-$120 | CISCO Certified |
| Mike Johnson | 3 years | $40-$90 | Microsoft Certified |
Finding the right technician can save time and money. You will get your monitor fixed quickly.
Frequently Asked Questions
How Do You Center Your Screen On Your Monitor?
Adjust the monitor settings using the control buttons. Navigate to the positioning menu and select “Center Screen. “
How Do You Fix A Misaligned Monitor?
To fix a misaligned monitor, adjust the display settings in your computer’s control panel. Use the monitor’s on-screen menu to center the screen. Check cable connections and update your graphics driver.
How Do I Move My Screen Back To The Center?
To center your screen, right-click the desktop, select “Display Settings,” and adjust the screen resolution.
Conclusion
Troubleshooting a screen not centered on a monitor can be simple. Adjust settings, update drivers, or check cables. These steps can help fix display issues. Ensuring your screen is centered improves your viewing experience. Always keep your monitor settings optimized for the best performance.
Happy computing!

Hello Good People! This is Pavel and Welcome to PC Delight!
I’m an Electronics Engineer by profession with a passion for Gaming & PC builds. When I came up with the idea for PC Delight, it was my goal to share & offer the very best PC building ideas to tech-loving people like myself.
Since my school days, I’ve been just addicted to gaming & PCs. That leads me to experiment with various ways around the very niche, resulting in great productivity. And I’m here to share those practical experiences. So that next time you start some experiment with your PC builds or struggle to cope with a certain game, I’m here with the solutions. With these philosophies, I started my journey in 2017 and just kept going.