Check connections and ensure all cables are securely plugged in. Update drivers for your graphics card and docking station.
Encountering issues with your Thinkpad docking station monitor can be frustrating, especially when you rely on multiple screens for productivity. Ensuring that all connections are secure is the first step. Sometimes, a loose cable can cause the monitor to stop working.
Updating drivers for both your graphics card and the docking station is crucial, as outdated drivers can lead to compatibility problems. If these steps don’t resolve the issue, consider testing the monitor and docking station with another device to rule out hardware faults. This simple troubleshooting can save you time and ensure your setup works seamlessly.
Initial Checks
Experiencing issues with your Thinkpad docking station monitor not working can be frustrating. Before diving into complex troubleshooting steps, it’s essential to perform some initial checks. These checks can often resolve common problems quickly and efficiently.
Power Supply
First, ensure that the docking station is receiving power. Check the power adapter and make sure it is securely connected to both the docking station and the power outlet.
Verify that the power indicator light on the docking station is lit. If the light is off, try using a different power outlet or adapter to rule out a faulty power supply.
Cable Connections
Next, inspect all cable connections between the docking station, monitor, and your Thinkpad.
- Ensure the monitor’s power cable is firmly plugged in.
- Check that the video cable (HDMI, DisplayPort, etc.) is securely connected.
- Verify that the docking station is properly connected to your Thinkpad’s USB-C or other relevant port.
If possible, use a different video cable or port to test for potential cable or port issues.
Display Settings
If your Thinkpad docking station monitor is not working, check your display settings. Misconfigured settings can cause display issues. Correcting these settings can help restore your display.
Resolution Adjustments
First, check the resolution settings. An incorrect resolution can cause a blank screen.
Follow these steps to adjust the resolution:
- Right-click on your desktop.
- Select Display settings.
- Scroll down to find the Resolution drop-down menu.
- Choose the recommended resolution.
- Click Apply to save changes.
Adjusting the resolution might fix your display issue. Ensure the resolution matches your monitor’s capabilities.
Multiple Displays Configuration
For setups with multiple monitors, ensure your configuration is correct. Incorrect settings can cause one or more monitors to not display.
Follow these steps to configure multiple displays:
- Right-click on your desktop.
- Select Display settings.
- Scroll down to find Multiple displays.
- Use the drop-down menu to choose your display mode:
- Duplicate: Same display on all monitors.
- Extend: Extend your desktop across monitors.
- Second screen only: Use only the external monitor.
- Click Apply to save changes.
Properly configuring multiple displays can help ensure all monitors work correctly.
Driver Updates
Keeping your drivers updated is crucial for the proper functioning of your Thinkpad docking station and monitor. Outdated drivers can lead to display issues, connectivity problems, and overall system instability. Below, we delve into two critical areas: Graphics Driver and Docking Station Firmware.
Graphics Driver
Updating the graphics driver is essential for a clear display. Follow these steps to ensure your graphics driver is up-to-date:
- Open the Device Manager.
- Expand the Display Adapters section.
- Right-click on your graphics card.
- Select ‘Update Driver’.
- Choose ‘Search automatically for updated driver software’.
If the automatic search doesn’t find a new driver, visit the manufacturer’s website. Download the latest driver for your specific graphics card model. Install it manually to ensure optimal performance.
Docking Station Firmware
The docking station firmware needs to be current to function correctly. Follow these steps to update the firmware:
- Visit the manufacturer’s support page.
- Search for your docking station model.
- Download the latest firmware update.
- Connect your docking station to the Thinkpad.
- Run the firmware update tool and follow the instructions.
Updating the firmware improves compatibility and fixes bugs. Always check for the latest firmware to keep your docking station running smoothly.

Credit: superuser.com
Docking Station Reset
Experiencing issues with your Thinkpad Docking Station Monitor not working? One effective solution is to perform a docking station reset. This can often resolve many common connectivity problems.
Power Cycle
A power cycle is a simple yet effective troubleshooting step. Follow these steps to perform a power cycle:
- Disconnect the docking station from the laptop.
- Unplug all connected peripherals.
- Remove the power cable from the docking station.
- Wait for 30 seconds to ensure all power is drained.
- Reconnect the power cable to the docking station.
- Connect the peripherals back to the docking station.
- Finally, reconnect the docking station to the laptop.
This process often resolves minor connectivity issues.
Factory Reset
If a power cycle doesn’t work, a factory reset might be necessary. This resets the docking station to its original settings. Here’s how to do it:
- Disconnect the docking station from your laptop.
- Locate the reset button on the docking station. This is usually a small, recessed button.
- Use a paperclip or a similar object to press and hold the reset button for 10 seconds.
- Release the button and wait for the docking station to restart.
- Reconnect the docking station to your laptop.
This should resolve more persistent issues with your Thinkpad Docking Station Monitor.
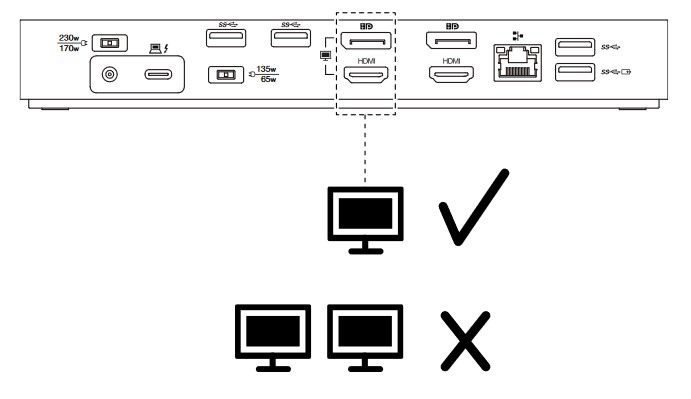
Usb-c And Hdmi Ports
Experiencing issues with your Thinkpad docking station monitor not working? The problem may lie in the USB-C and HDMI ports. These ports are essential for connecting your monitor to the docking station. Ensuring they function correctly is crucial for a seamless experience.
Port Inspection
Start by inspecting the USB-C and HDMI ports on your docking station and monitor. Look for any visible damage or debris that could block the connection. Use a small, soft brush to clean the ports if necessary.
Next, ensure the cables are properly connected. A loose cable can cause your monitor to stop working. Double-check both ends of the cable to confirm a secure connection.
| Inspection Steps | Description |
|---|---|
| Visual Check | Look for damage or debris. |
| Cleaning | Use a soft brush to clean ports. |
| Cable Check | Ensure cables are securely connected. |
Alternate Port Testing
If the ports appear fine, try using alternate ports. Your docking station might have multiple USB-C and HDMI ports. Switch to a different port to see if the monitor works.
Using another port can help identify if a specific port is faulty. If the monitor works with a different port, the original port may need repair.
- Identify alternate ports on your docking station.
- Connect the monitor to a different port.
- Check if the monitor displays correctly.
Testing with alternate ports is a simple yet effective troubleshooting step. This can quickly determine if the issue is with a specific port.
By following these steps, you can diagnose and potentially fix your Thinkpad docking station monitor issue. Proper inspection and testing are key.
Operating System Settings
Having trouble with your Thinkpad docking station monitor? The problem might lie in your operating system settings. These settings need proper configuration to ensure your monitor works correctly.
Windows Display Settings
Check your Windows display settings to resolve monitor issues. Follow these simple steps:
- Right-click on the desktop and select Display settings.
- Scroll down to the Multiple displays section.
- Ensure the docking station monitor is detected. If not, click Detect.
- Choose your desired display mode (Extend, Duplicate, etc.).
If the monitor still does not work, try updating your graphics driver. Open Device Manager and expand the Display adapters section. Right-click your graphics card and select Update driver. Follow the prompts to complete the update.
Macos Display Preferences
For Mac users, adjusting the display preferences can help. Follow these steps:
- Click the Apple menu and select System Preferences.
- Choose Displays and then click the Arrangement tab.
- Ensure the docking station monitor is shown. If not, click Detect Displays.
- Drag the display boxes to arrange them as desired.
If the issue persists, ensure your MacOS is up to date. Click the Apple menu, select About This Mac, then click Software Update.
| Steps | Windows | MacOS |
|---|---|---|
| Open Settings | Right-click on desktop | Apple menu > System Preferences |
| Detect Monitor | Click Detect | Click Detect Displays |
| Arrange Displays | Choose display mode | Drag display boxes |
Software Conflicts
Software conflicts can cause your Thinkpad docking station monitor to stop working. These conflicts occur when software programs interfere with each other. Understanding the causes of these conflicts can help you troubleshoot and resolve them.
Third-party Applications
Third-party applications can interfere with your docking station’s functionality. Some programs may not be compatible with your system. This can lead to display issues.
Consider these steps to identify problematic applications:
- Check recently installed software.
- Uninstall non-essential applications one by one.
- Restart your system after each uninstallation.
- Observe if the monitor starts working.
If the monitor works after uninstalling a program, that program was likely causing the issue.
Antivirus Interference
Antivirus software can block essential drivers. This can prevent your monitor from working. Some antivirus programs are aggressive in their protection measures.
To troubleshoot antivirus interference:
- Open your antivirus program.
- Go to the settings menu.
- Find the section for exceptions or exclusions.
- Add your docking station software to the exceptions list.
- Restart your computer to apply the changes.
If the monitor works after adding exceptions, the antivirus was the problem.
In some cases, you may need to switch antivirus software. Choose one that is less likely to cause conflicts.
Credit: www.reddit.com
Hardware Issues
Experiencing problems with your Thinkpad Docking Station Monitor? Hardware issues might be the culprit. This section will help you identify and address potential hardware problems.
Docking Station Damage
Docking stations can suffer from physical damage. Inspect your docking station for visible signs of damage.
- Cracks or dents on the surface.
- Loose or bent connectors.
- Broken or missing parts.
Physical damage might cause connection problems. Ensure all connectors are in good condition.
Monitor Faults
Your monitor could also be faulty. Check the following to identify potential issues:
- Ensure the power cable is securely connected.
- Inspect the display cable for any damage.
- Test the monitor with a different device.
- Check if the monitor’s settings are correct.
If the monitor works with other devices, the problem might be with the docking station. Ensure your monitor settings match the docking station requirements.
| Issue | Possible Cause |
|---|---|
| No Display | Faulty cable or connector |
| Flickering Screen | Loose connection or damaged cable |
| Incorrect Resolution | Wrong monitor settings |
By addressing these hardware issues, you can resolve many common problems with your Thinkpad Docking Station Monitor.
Bios Configuration
Having trouble with your Thinkpad docking station monitor? The issue might lie in the BIOS configuration. The BIOS manages hardware settings. Incorrect settings can cause the monitor not to work.
Bios Update
Always keep your BIOS updated. An outdated BIOS can cause compatibility issues. Follow these steps to update your BIOS:
- Visit the official Lenovo support website.
- Enter your Thinkpad model number.
- Download the latest BIOS update.
- Run the installer and follow instructions.
Updating the BIOS can resolve many hardware issues. Make sure to restart your system after the update.
Display Settings In Bios
Incorrect display settings in the BIOS can cause monitor issues. To check and adjust these settings, follow these steps:
- Restart your Thinkpad and press F1 to enter BIOS.
- Navigate to the Config tab.
- Select Display and press Enter.
- Ensure the Boot Display Device is set to Docking Station.
- Save changes and exit BIOS.
Ensure all settings are correct. Incorrect settings can prevent the monitor from working.
Support And Warranty
Experiencing issues with your Thinkpad Docking Station Monitor not working can be frustrating. Understanding the support and warranty options available can help you resolve these issues efficiently.
Manufacturer Support
Lenovo offers comprehensive support for their Thinkpad Docking Stations. You can contact Lenovo’s customer support team through their official website. They provide troubleshooting guides, software updates, and FAQ sections.
For more personalized help, you can use Lenovo’s live chat feature. This allows you to directly communicate with a support representative. They can guide you step-by-step to fix your docking station issue.
You may also find useful information in Lenovo’s community forums. Here, users share their experiences and solutions for similar problems.
Warranty Claims
If your Thinkpad Docking Station is under warranty, you can initiate a warranty claim. Lenovo’s warranty covers defects in materials and workmanship.
To start a claim, visit Lenovo’s warranty claim page. You will need to provide the serial number of your docking station. This helps verify the warranty status.
| Warranty Coverage | Details |
|---|---|
| Standard Warranty | 1 year of coverage for hardware defects. |
| Extended Warranty | Available for purchase, extends coverage. |
Lenovo also offers an extended warranty option. This can be purchased to provide additional coverage beyond the standard warranty period.
Always keep your purchase receipt and warranty card safe. These documents are required for any warranty claim.
Credit: m.youtube.com
Frequently Asked Questions
Why Is My Lenovo Docking Station Not Recognizing My Monitors?
Your Lenovo docking station might not recognize monitors due to outdated drivers, faulty cables, incorrect settings, or power issues. Ensure all cables are securely connected, update drivers, and check power supply.
Why Is My Lenovo Not Detecting My Monitor?
Your Lenovo might not detect the monitor due to loose connections, outdated drivers, or incorrect display settings. Ensure cables are secure, update drivers, and check display settings in the control panel.
How Do I Get My Monitor To Recognize My Docking Station?
Connect your monitor to the docking station using the correct cable. Ensure both devices are powered on. Update drivers for your docking station. Access display settings on your computer and configure the monitor. Restart the system if necessary.
Conclusion
Resolving issues with your Thinkpad docking station monitor can enhance productivity. Follow the troubleshooting steps mentioned. Ensure all connections are secure and drivers updated. Regular maintenance can prevent future problems. With these tips, your setup should work smoothly. For persistent issues, consider professional assistance.
Happy computing!

Hello Good People! This is Pavel and Welcome to PC Delight!
I’m an Electronics Engineer by profession with a passion for Gaming & PC builds. When I came up with the idea for PC Delight, it was my goal to share & offer the very best PC building ideas to tech-loving people like myself.
Since my school days, I’ve been just addicted to gaming & PCs. That leads me to experiment with various ways around the very niche, resulting in great productivity. And I’m here to share those practical experiences. So that next time you start some experiment with your PC builds or struggle to cope with a certain game, I’m here with the solutions. With these philosophies, I started my journey in 2017 and just kept going.